This is my I typical breakfast that I usually eat at work. Coffee (in my pretty anthro mug thanks to Devin), water, organic yogurt & mixed nuts. How do you start your day?
xoxo,
Adora
Start with your sad dry wooden cutting board. It’s so far gone you think you might get splinters, but don’t lose hope.
Get some of this stuff. Mineral Oil. Don’t use olive oil. Have you ever smelled olive oil that’s had too much air exposure and gets that horrible rancid smell? That will happen to your cutting board if you use olive oil. No, no. Yucky. Next step.
I’m sure your grandma knows how to do this better. I’ve heard people say everything about going with the grain or against it or around it, but I don’t actually know what any of that means. So, I spill the mineral oil on it, try to spread it out while I spill, then wipe the entire board with oil using a paper towel. It’s not the most graceful process, but it get’s the oil in there.
Bing. Bang. Boom. You got yourself a well oiled machine! Wait, not machine. Well oiled cutting board, let’s make that the new phrase. Huzzah! Easy as pie, babies. Pie you can eat off of your beautiful cutting board.
xoxo,
Adora
I’m so pumped about these birch style paper straws that you can get here from amazon. They’re so cute! Yay!
xoxo,
Adora
What’s that saying about being poor making you thrifty? I can’t remember. Maybe I imagined it. Either way, I think it’s true. I’ve never been more creative in anything than when forced to work with limited resources, in this case, monetary resources. Because I like to redecorate and still afford groceries, I’ve been learning how to take an idea for something I love but can’t afford.
How does that tie-in to a dresser re-finish? I’ll explain.
There’s a dresser I love at Ikea. It’s beautiful, cream colored with black hardware, 7 drawers, pretty much exactly what I wanted for my room re-model. However, the $300 price tag caught me every time. Whenever I’m going to make a big purchase, I compare what else I could get for that amount of money to decide if it’s worth it. For $300 I could go to the keys for a weekend. I could get a cheap flight somewhere. I could do months of Pilates classes. I could cook a whole bunch of fancy dinners and drink a lot of wine. Sigh. I couldn’t bring myself to do it.
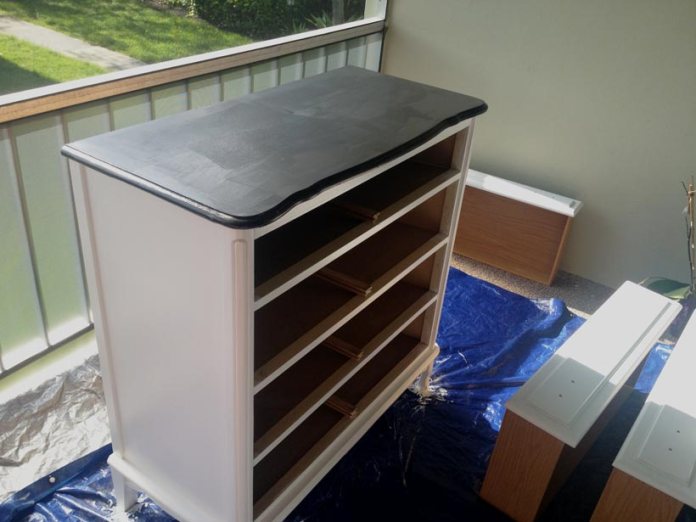
So on to plan B, I headed out to the thrift shop with Amy and Adora. And at Faith Farm I found this treasure. For $60 I found a dresser whose shape I loved. The color not so much, but it was nothing some sanding, priming, and painting couldn’t fix. And of course some black spray paint for the hardware.
So I give you my monochromatic take on a French dresser. I’m excited to see this piece against my book-wall. Let me know what you think!
xo. Brie


I painted the white first and let it dry for a day, then taped around the top and painted the black top.
Briana is a beautiful SEO/Ad genius who works with me at my day job and has an amazing blog over at accordingtobrie.com that you should check out!
xoxo,
Adora
This week was…let’s just say not the greatest week I’ve ever had. I got to the level of upset beyond crying and just relatively comatose. This is pretty standard for me, my brain will only let me have so many emotions and then it’s like “that’s enough of these feeling things for you” and I kind of just go nuetral. Well, many things added up this week and I got to that point on Wednesday. So, when Josh picked me up from work we talked a little, he took me out to get my favorite soup and then when we went home he drew me a bath.
We had talked a few days before hand just in passing how it’s been years since I’ve had a bath (since I’m a shower girl) and it used to be something I would do to relax. So, he started the water running, found random Star Wars bubble bath that my sister had given him for Christmas, lit all the candles he could find and started some Explosions in the Sky playing softly. It was magic. I sat in that water and (carefully) read my kindle for at least an hour…maybe two (okay, it was two) and I didn’t realize the candles shouldn’t have been bright enough to read by until I looked up and saw my book light clipped to the shower shelves.
That boy thought of everything. I think this is going to become the nice (FREE) thing he does for me when things just aren’t going my way & you are not going to hear me complaining about that!
Do you love baths? What do you do to relax?
xoxo,
Adora
Some of you commented on the new coffee table in my Slipcover update post. That is acutally not a new coffee table, but the result of a loving husband FINALLY reading the pin I sent him of the Ikea hack coffee table update by The Feminist Mystique months ago and while I was away at NTEN; surprising me by doing the project. Here are some of the pictures he took along the way.
I got to say, the boy can get stuff done.
xoxo,
Adora
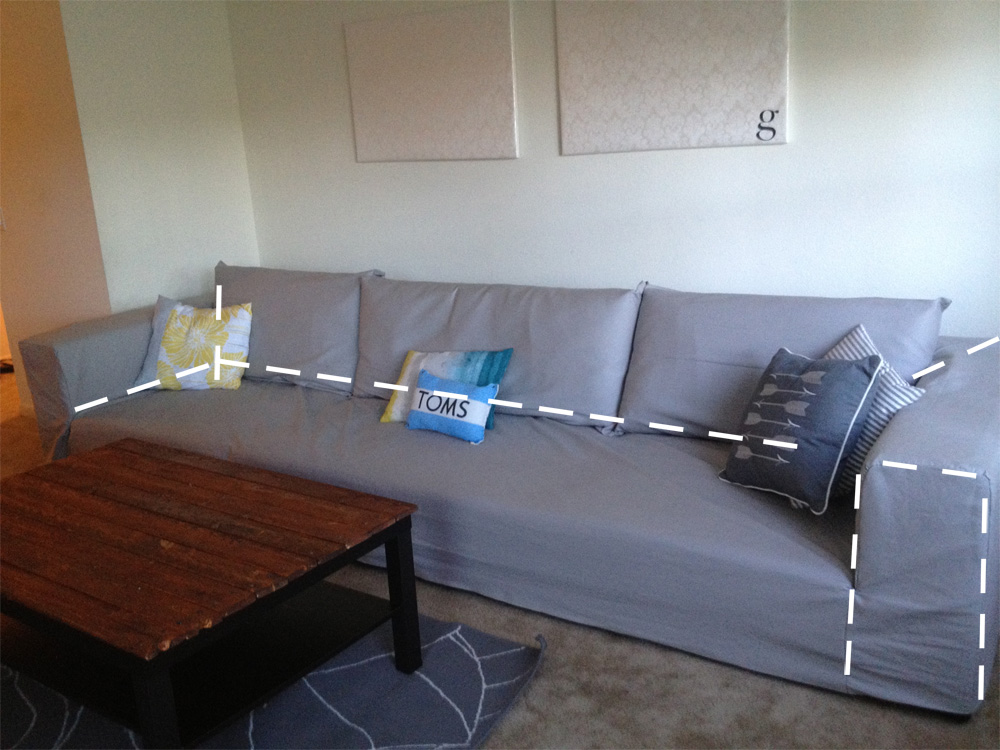
Well… actually an update on our couch. I told you here that my mom was coming to help me make a slipcover. She came, she saw, she sewed. I helped…a little. So, now I present to you the slipcover that my mom and I sewed BY HAND in one weekend…and the cushion covers that I sewed. My couch is all right angles and the duck cloth we made the slipcover with had finished sides that looked nice enough to me so we carefully (cleverly) planned the entire thing to have minimal sewing required. The back and sides of the couch were one long cut of the cloth that even came over the top of the back and ended where the seat meets the back of the couch, another piece went from the floor over the front meeting the other seam. Then we had diagonal seems at the top of the two corners, and some in the front where there are rectangular pieces. We ran out of cloth to cover the ottoman, so I put it in the guest room closet for now and I got to say, I think the room looks much bigger without it. So, for about 22 yards of duck cloth (yes, we had to hit up 2 different’ Joanne’s) and upholstery thread and needles I paid about $150. Not too bad, and much cheaper than any new couch, or buying a 13 foot long slip cover. I threw some skinny dowels into the recesses making the couch fit tighter and my mom iced her swollen fingers and we ended up with this beauty…


The dashed lines mark the seams. The seams are identical on both sides of the couch because the couch is symmetrical. There is an angled seam at the top of both corners of the couch that runs down to meet the seat area. A seam along the back of the sitting area, as well as the two sides. We gave extra room for these when sewing and stuffed them down with dowels to keep the couch taught. Then there are square seams on the front of the couch arms.
So what do you think? It was easier than I thought it would be, we got it done in a day and a half [BY HAND] if we had used a machine, it would have been a few hours tops. Do you want to try something like this? Do it.
xoxo,
Adora
Because I married a nerd [his words] half of my mugs are something like this. We have a Thor mug where the handle is actually the Mjolnir [calm down nerds, I googled that word, I almost left it as meow meow], we have several Star Wars mugs, other Avengers mugs and then there’s this bad boy. The problem is, I’m the one who drinks coffee. Maybe too much coffee, but still at the end of the day, I’m the one nerd muggin’.
What’s your weirdest coffee mug?
xoxo,
Adora